Primary Method: Through Grama/Ward Sachivalayam
This is the most common and official method for all Rice Card modifications, including member addition.
AP Ration Card Member Addition Status Check Online with “T” Number Process
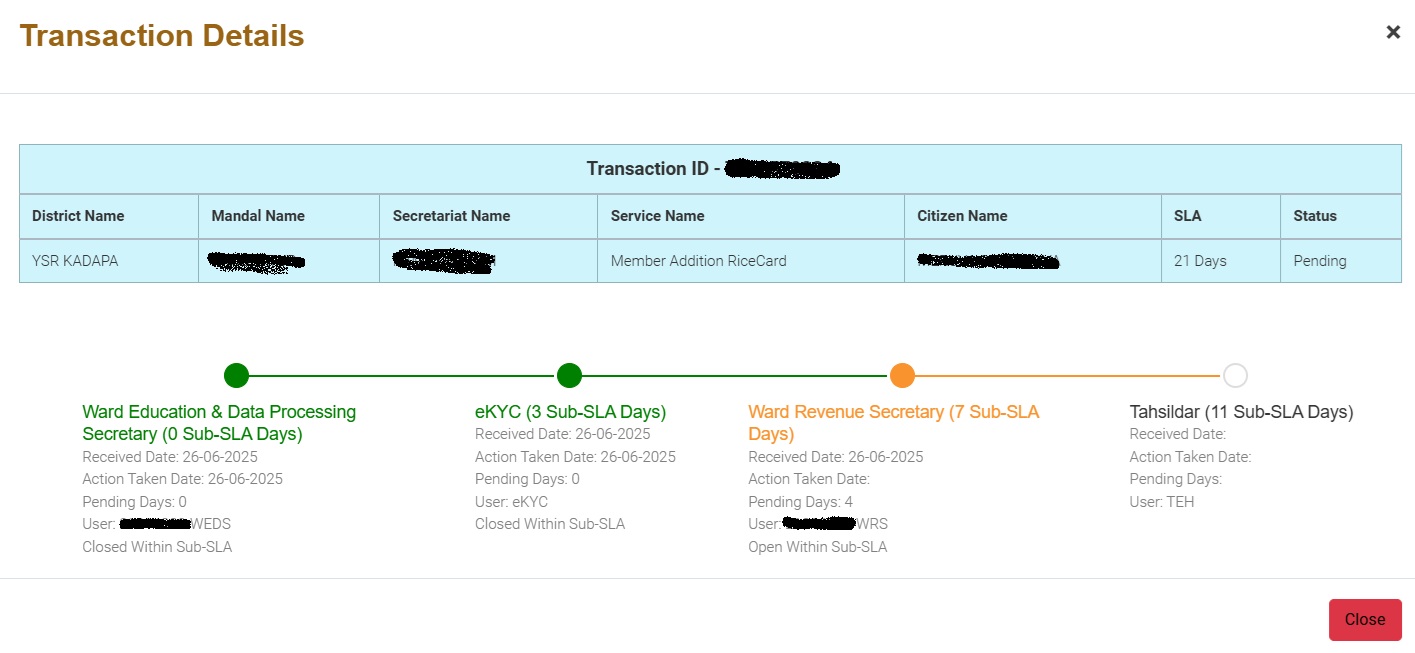
How to check Member addition Status in Ration Card ?
First open website : vswsonline.ap.gov.in
In “Service Request Status Check” Box – Enter the “T” Number which you received to your registered mobile number

Click on search button and Type the “Captcha Verification“
Now you are able to check / Track Ration Card Member Addition Status
Who Can Be Added?
You can apply to add a member in the following common scenarios:
-
Newborn Child: Adding a baby born into the family.
-
Newly Married Spouse: Adding a wife to her husband’s family card or a husband to his wife’s family card after marriage.
-
Transfer: A member who was previously on another Rice Card (e.g., their parents’ card) and has now moved in with the family.
📄 Required Documents
When adding a newborn:
-
Child’s Birth Certificate
-
Child’s Aadhaar card
-
Parents’ Aadhaar cards
-
Existing Ration Card (Rice Card)
-
Aadhaar address must match the ration card’s locality and C/O field must align
When adding a married woman:
-
Her Aadhaar card (address must match locality)
-
Marriage certificate (if available)
-
Wedding photograph
-
If no marriage certificate, husband’s name listed in Aadhaar’s C/O section
Fee
-
Just ₹24 per member, regardless of birth or marriage
How & Where to Apply
-
Visit your local Grama/Ward Sachivalayam (Village or Ward Secretariat).
-
Submit the Member Addition application form with required documents.
-
Pay the ₹24 fee (via Meeseva portal): Credit/Debit card, Internet banking (e.g., Rupay, SBI), or wallet
- Receive a receipt with an “application number.”
Verification & Approval Workflow
-
e-KYC Biometric Verification using GSWS App (done by VRO/GSWS staff)
-
Forward to Mandal Revenue Officer (MRO) for multi-level validation.
-
If discrepancies are found, you’ll be informed and requested to rectify.
-
Once approved, the member is officially added.
-
Getting the Updated Ration Card
-
You can download a PDF of your updated card online via Meeseva/EPDS portal.
-
Later, you’ll receive the smart ATM‑size ration card through the Secretariat or VRO
Timeframe & Important Dates
-
A limited-time window (last one was till May 31, 2025) is usually provided ahead of mass smart-card rollout
-
If the current enrollment window is open, follow the same steps.
-
No strict deadline is often cited—follow announcements for the new batch.
Step-by-Step Process
Step 1: Gather the Required Documents
Before visiting the Sachivalayam, make sure you have all the necessary documents. This is the most crucial step.
Mandatory Documents for All Cases:
-
Original Rice Card: The existing family ration card to which the member will be added.
-
Aadhaar Card of the Head of the Family: And their presence for biometric (eKYC) authentication.
-
Aadhaar Card of the New Member: The Aadhaar card of the person being added is mandatory.
-
Important: The new member’s Aadhaar must have their current address updated, or at least the address of their parent/spouse.
-
-
Mobile Number: A working mobile number linked to the Aadhaar of the Head of Family for OTPs and updates.
Additional Documents Based on the Reason for Addition:
-
For a Newborn Child:
-
Birth Certificate: The official birth certificate issued by the municipality or gram panchayat is mandatory.
-
Child’s Aadhaar Card (if available). If not, the application can be initiated with the birth certificate, but Aadhaar will be required later.
-
-
For Adding a Spouse (after marriage):
-
Marriage Certificate: The official marriage certificate issued by the registration office.
-
Deletion Certificate (if applicable): If the spouse’s name was previously on her parents’ Rice Card, you need a confirmation or proof that her name has been removed from that card. This is often done as part of the “Member Migration” service at the Sachivalayam.
-
Step 2: Visit Your Local Grama/Ward Sachivalayam
Go to the Sachivalayam office that serves your residential area. You cannot go to any random Sachivalayam; it must be the one assigned to your address.
Step 3: Contact the Digital Assistant or Village/Ward Volunteer
Approach the Digital Assistant (DA) at the Sachivalayam counter. They are the officials who handle these service requests. Your local Village/Ward Volunteer can also guide you and assist with the process.
Step 4: The Application Process at Sachivalayam
-
State Your Request: Inform the Digital Assistant that you want to add a member to your Rice Card (“Rice Card lo member addition”).
-
Provide Documents: Submit all the original documents and photocopies as requested.
-
eKYC (Biometric Authentication): The Head of the Family must provide their fingerprint for biometric verification to authorize the change. In some cases, the member being added might also need to provide their biometrics.
-
Data Entry: The Digital Assistant will fill out the application online through the official government portal (like the Spandana portal). They will enter the new member’s details and upload scanned copies of your documents.
-
Receive Acknowledgement: Once the application is submitted, you will receive an application ID or a printed acknowledgement receipt. Keep this receipt safely, as it is used to track the status of your application.
Step 5: Verification Process
After you submit the application, it goes through a verification process:
-
The application is forwarded electronically to the Village Revenue Officer (VRO) or Ward Administrative Secretary.
-
They will verify the details provided (e.g., check if the member genuinely resides at the given address).
-
The application is then sent to the Tahsildar (MRO) for final approval.
Step 6: Approval and Updation
-
Once the Tahsildar approves the request, the new member’s name will be officially added to your Rice Card database.
-
You can track the status of your application online on the Spandana portal or by inquiring at the Sachivalayam using your application ID.
-
After approval, you can get an updated printout of your Rice Card with the new member’s name included from the Sachivalayam.
Key Points to Remember
-
Timeline: The entire process, from application to approval, usually takes 15 to 30 days, depending on the speed of verification by the officials.
-
Fees: There is no official government fee for adding a member. However, the Sachivalayam may collect a nominal service charge for the application.
-
Is it Possible Online? A citizen cannot directly apply for member addition from home via a public website. The “online” process is done by the Digital Assistant at the Sachivalayam. Your physical presence for eKYC is mandatory.
-
Aadhaar is Key: The entire system is linked to Aadhaar. Ensure the Aadhaar details of all members are correct and up-to-date.
-
Role of Volunteer: Your Village/Ward Volunteer is a good point of contact for follow-ups and to know the status of your application.
ఆంధ్రప్రదేశ్లో రైస్ కార్డ్లో కొత్త సభ్యుని పేరు చేర్చే విధానం
ఆంధ్రప్రదేశ్లో ఈ ప్రక్రియను చాలా సరళతరం చేశారు. ప్రస్తుతం ఇది పూర్తిగా గ్రామ/వార్డు సచివాలయాల ద్వారానే జరుగుతుంది.
ప్రాథమిక పద్ధతి: గ్రామ/వార్డు సచివాలయం ద్వారా
రైస్ కార్డ్లో సభ్యుని పేరు చేర్చడానికి ఇది అధికారిక మరియు అత్యంత సులభమైన పద్ధతి.
ఎవరిని చేర్చవచ్చు?
సాధారణంగా ఈ క్రింది సందర్భాలలో కొత్త సభ్యుల పేర్లను చేర్చడానికి దరఖాస్తు చేసుకోవచ్చు:
-
కొత్తగా పుట్టిన బిడ్డ: కుటుంబంలో జన్మించిన పసిపిల్లల పేరును చేర్చడానికి.
-
వివాహం తర్వాత (భార్య/భర్త): వివాహం అయిన తర్వాత భార్య పేరును భర్త రైస్ కార్డ్లో లేదా భర్త పేరును భార్య రైస్ కార్డ్లో చేర్చడానికి.
-
బదిలీ (Migration): గతంలో వేరే రైస్ కార్డ్లో (ఉదా: తల్లిదండ్రుల కార్డు) ఉండి, ఇప్పుడు మీ కుటుంబంతో నివసిస్తున్న సభ్యుని పేరును చేర్చడానికి.
దశల వారీగా పూర్తి ప్రక్రియ
1వ దశ: అవసరమైన పత్రాలను సిద్ధం చేసుకోండి
సచివాలయానికి వెళ్లే ముందు, అవసరమైన అన్ని పత్రాలు మీ వద్ద ఉన్నాయని నిర్ధారించుకోండి. ఇది చాలా ముఖ్యమైన దశ.
అన్ని సందర్భాలకు తప్పనిసరి పత్రాలు:
-
ఒరిజినల్ రైస్ కార్డ్: ప్రస్తుతం మీ కుటుంబానికి ఉన్న అసలు రైస్ కార్డ్.
-
కుటుంబ యజమాని ఆధార్ కార్డ్: బయోమెట్రిక్ (eKYC) కోసం కుటుంబ యజమాని తప్పనిసరిగా హాజరు కావాలి.
-
కొత్త సభ్యుని ఆధార్ కార్డ్: ఎవరి పేరునైతే చేర్చాలనుకుంటున్నారో వారి ఆధార్ కార్డ్ తప్పనిసరి.
-
ముఖ్య గమనిక: కొత్త సభ్యుని ఆధార్ కార్డులో ప్రస్తుత చిరునామా లేదా కనీసం వారి తల్లిదండ్రులు/భర్త చిరునామా అప్డేట్ అయి ఉండాలి.
-
-
మొబైల్ నంబర్: OTPలు మరియు అప్డేట్ల కోసం కుటుంబ యజమాని ఆధార్తో లింక్ అయిన మొబైల్ నంబర్.
సందర్భాన్ని బట్టి అదనపు పత్రాలు:
-
కొత్తగా పుట్టిన బిడ్డ కోసం:
-
జనన ధృవీకరణ పత్రం (Birth Certificate): మున్సిపాలిటీ లేదా గ్రామ పంచాయతీ జారీ చేసిన అసలు జనన ధృవీకరణ పత్రం తప్పనిసరి.
-
పిల్లల ఆధార్ కార్డ్ (అందుబాటులో ఉంటే). లేనప్పటికీ, జనన ధృవీకరణ పత్రంతో దరఖాస్తు చేయవచ్చు, కానీ తర్వాత ఆధార్ తప్పనిసరిగా సమర్పించాలి.
-
-
వివాహం తర్వాత భార్య/భర్తను చేర్చడానికి:
-
వివాహ ధృవీకరణ పత్రం (Marriage Certificate): రిజిస్ట్రేషన్ కార్యాలయం జారీ చేసిన అధికారిక వివాహ ధృవీకరణ పత్రం.
-
తొలగింపు ధృవీకరణ పత్రం (Deletion Certificate): ఒకవేళ చేర్చబోయే సభ్యుని పేరు గతంలో వారి తల్లిదండ్రుల రైస్ కార్డ్లో ఉంటే, ఆ కార్డు నుండి వారి పేరు తొలగించబడిందని నిర్ధారించే పత్రం అవసరం. సచివాలయంలో “సభ్యుల బదిలీ (Member Migration)” సేవ ద్వారా ఈ ప్రక్రియను పూర్తి చేస్తారు.
-
2వ దశ: మీ స్థానిక గ్రామ/వార్డు సచివాలయానికి వెళ్లండి
మీ నివాస ప్రాంతానికి కేటాయించిన సచివాలయ కార్యాలయానికి వెళ్లండి. వేరే ఏ సచివాలయానికి వెళ్లినా మీ దరఖాస్తు స్వీకరించబడదు.
3వ దశ: డిజిటల్ అసిస్టెంట్ లేదా గ్రామ/వార్డు వాలంటీర్ను సంప్రదించండి
సచివాలయంలోని డిజిటల్ అసిస్టెంట్ (DA) కౌంటర్ వద్దకు వెళ్లండి. ఈ సేవల దరఖాస్తులను వారే స్వీకరిస్తారు. మీ స్థానిక వాలంటీర్ కూడా మీకు ఈ ప్రక్రియలో సహాయం చేయగలరు.
4వ దశ: సచివాలయంలో దరఖాస్తు ప్రక్రియ
-
మీ అభ్యర్థనను తెలియజేయండి: “రైస్ కార్డ్లో సభ్యుని పేరు చేర్చాలి” అని డిజిటల్ అసిస్టెంట్కు స్పష్టంగా చెప్పండి.
-
పత్రాలను సమర్పించండి: మీ వద్ద ఉన్న అన్ని ఒరిజినల్ మరియు జిరాక్స్ కాపీలను వారికి అందించండి.
-
eKYC (బయోమెట్రిక్): మార్పును ఆమోదించడానికి కుటుంబ యజమాని తప్పనిసరిగా వారి వేలిముద్రను బయోమెట్రిక్ ద్వారా ధృవీకరించాలి. కొన్నిసార్లు, కొత్తగా చేరే సభ్యుని బయోమెట్రిక్ కూడా అవసరం కావచ్చు.
-
డేటా ఎంట్రీ: డిజిటల్ అసిస్టెంట్ అధికారిక ప్రభుత్వ పోర్టల్ (స్పందన పోర్టల్ వంటివి) ద్వారా ఆన్లైన్లో దరఖాస్తును నింపుతారు. వారు కొత్త సభ్యుని వివరాలను నమోదు చేసి, మీ పత్రాలను స్కాన్ చేసి అప్లోడ్ చేస్తారు.
-
రసీదు పొందండి: దరఖాస్తు సమర్పించిన తర్వాత, మీకు ఒక అప్లికేషన్ ఐడి లేదా ప్రింటెడ్ రసీదు ఇస్తారు. ఈ రసీదును జాగ్రత్తగా ఉంచుకోండి. దీని ద్వారానే మీ దరఖాస్తు స్థితిని తెలుసుకోవచ్చు.
5వ దశ: ధృవీకరణ ప్రక్రియ (Verification Process)
మీరు దరఖాస్తు సమర్పించిన తర్వాత, అది ధృవీకరణ కోసం అధికారులకు పంపబడుతుంది:
-
దరఖాస్తు ఎలక్ట్రానిక్గా గ్రామ రెవెన్యూ అధికారి (VRO) లేదా వార్డు అడ్మినిస్ట్రేటివ్ సెక్రటరీకి పంపబడుతుంది.
-
వారు అందించిన వివరాలను (ఉదా: సభ్యుడు నిజంగా ఆ చిరునామాలో నివసిస్తున్నారా లేదా అని) క్షేత్రస్థాయిలో పరిశీలిస్తారు.
-
తర్వాత, తుది ఆమోదం కోసం దరఖాస్తు తహసీల్దార్ (MRO) కార్యాలయానికి వెళ్తుంది.
6వ దశ: ఆమోదం మరియు అప్డేట్
-
తహసీల్దార్ దరఖాస్తును ఆమోదించిన వెంటనే, కొత్త సభ్యుని పేరు మీ రైస్ కార్డ్ డేటాబేస్లో అధికారికంగా చేర్చబడుతుంది.
-
మీ అప్లికేషన్ ఐడిని ఉపయోగించి స్పందన పోర్టల్లో లేదా సచివాలయంలో మీ దరఖాస్తు స్థితిని తెలుసుకోవచ్చు.
-
ఆమోదం పొందిన తర్వాత, మీరు కొత్త సభ్యుని పేరుతో అప్డేట్ చేయబడిన రైస్ కార్డ్ ప్రింటవుట్ను సచివాలయం నుండి పొందవచ్చు.
ముఖ్యమైన గమనికలు
-
కాలపరిమితి: దరఖాస్తు చేసినప్పటి నుండి ఆమోదం వరకు ఈ ప్రక్రియకు సాధారణంగా 15 నుండి 30 రోజులు పడుతుంది. ఇది అధికారుల ధృవీకరణ వేగంపై ఆధారపడి ఉంటుంది.
-
రుసుము: సభ్యుని పేరు చేర్చడానికి ప్రభుత్వం అధికారికంగా ఎలాంటి రుసుము వసూలు చేయదు. కానీ, సచివాలయంలో దరఖాస్తు ఫారం కోసం నామమాత్రపు సేవా రుసుము వసూలు చేయవచ్చు.
-
ఆన్లైన్లో సాధ్యమేనా? పౌరులు నేరుగా ఇంటి నుండి ఆన్లైన్లో దరఖాస్తు చేసుకోలేరు. ఆన్లైన్ ప్రక్రియను సచివాలయంలోని డిజిటల్ అసిస్టెంట్ మాత్రమే చేస్తారు. eKYC కోసం మీ భౌతిక హాజరు తప్పనిసరి.
-
ఆధార్ కీలకం: ఈ వ్యవస్థ మొత్తం ఆధార్తో అనుసంధానించబడింది. కాబట్టి, కుటుంబంలోని అందరి ఆధార్ వివరాలు సరిగ్గా, అప్డేట్గా ఉన్నాయని నిర్ధారించుకోండి.
-
వాలంటీర్ పాత్ర: మీ గ్రామ/వార్డు వాలంటీర్తో టచ్లో ఉండటం ద్వారా మీ దరఖాస్తు స్థితిని సులభంగా తెలుసుకోవచ్చు.
Leave a Reply